

The Essentials of Building a Basic Reverse Proxy with YARP and C# .NET
In this short insight, we’ll take a quick look at the fundamentals of proxies and reverse proxies, and then we’ll build one using YARP, a powerful open-source reverse proxy created by Microsoft.
YARP is so good that they actually combined it with Kestrel and replaced their nginx implementation on their App Service platform. If you’re curious about this whole process, I suggest you read the following article: “A Heavy Lift: Bringing Kestrel + YARP to Azure App Services“.
Now, let’s get back to proxies.
What’s a Proxy Server?
In computer networking, a proxy server is a server that acts as an intermediary for requests between a client and a server over the internet.
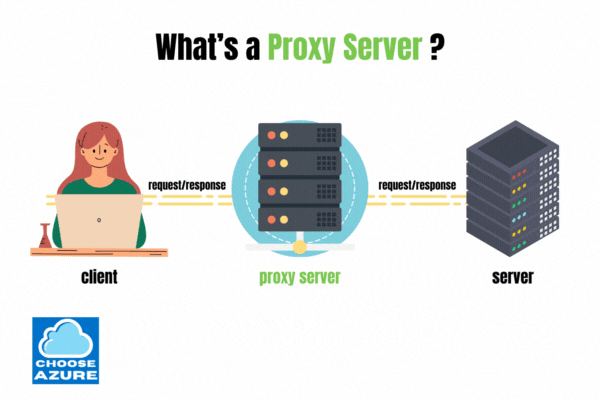
So, let’s say the client above is Jessica, and she wants to visit her favorite shopping website, which is hosted on the server to the far right. She opens her browser, types in the web address of her favorite site, and, once the site loads, she immediately starts browsing for her new shoes.
Jessica, however, works in IT and is aware that everything and everyone is being tracked on the internet. Therefore, she decided to set up a proxy server between her and the shopping website so that no one but the proxy server knows who she is.
So, let’s follow the process:
- Jessica sets up a proxy server (in this case, in her browser settings).
- She types the website address of her favorite shopping website into the browser.
- The request then goes to the proxy server, not directly to the shopping website.
- The proxy server redirects the request to the shopping website.
- The website server sees the proxy server, not Jessica, as the client, so it creates a TCP connection with it.
- Everything that the shopping website server returns from now on is redirected back to Jessica, and everything that Jessica sends is redirected to the shopping server, with the proxy server acting as the middleman between the two.
Subscribed
Benefits of a Proxy Server
- Enhanced Privacy and Security: This is one of the primary benefits of using a proxy server. It ensures that no one but the proxy server knows who you are, offering an additional layer of anonymity online. This is exactly what Jessica achieved by using a proxy server in our example.
- Access to Location-Specific Content: Content restrictions, such as TV shows on Netflix or access to certain websites, are often region-specific. A proxy server located in the desired region can bypass these restrictions, granting access to otherwise unavailable content.
- Packet Filtering: Acting as a middleman, the proxy server receives every request and can either redirect it to its intended destination or block it based on specific filtering criteria. This explains why you might not be able to browse Instagram at work—the company’s proxy server is likely filtering access to it.
- Speed: In some cases, accessing content through a proxy server can be faster, thanks to the potential for efficient route optimization, though this is not always guaranteed.
- Caching: Proxy servers can store (cache) copies of frequently accessed web content. This reduces loading times for repeated requests and decreases bandwidth usage, leading to improved overall performance and efficiency.
- Other Benefits: Depending on the configuration, proxy servers can offer additional functionalities, such as load balancing, which helps distribute incoming requests evenly across multiple servers to ensure reliable and efficient access to web services.
Now that we understand the fundamentals of what a proxy server is, let’s delve into what a reverse proxy server entails.
What’s a Reverse Proxy Server?
It operates under the same basic principles as a regular proxy server, but, as the name suggests, it functions in reverse.
Instead of intercepting requests from a client to forward them to a server on the internet, a reverse proxy intercepts requests coming from the internet and forwards them to a local server or a cluster of servers. This setup plays a crucial role in load balancing, security, and performance enhancements for web applications.
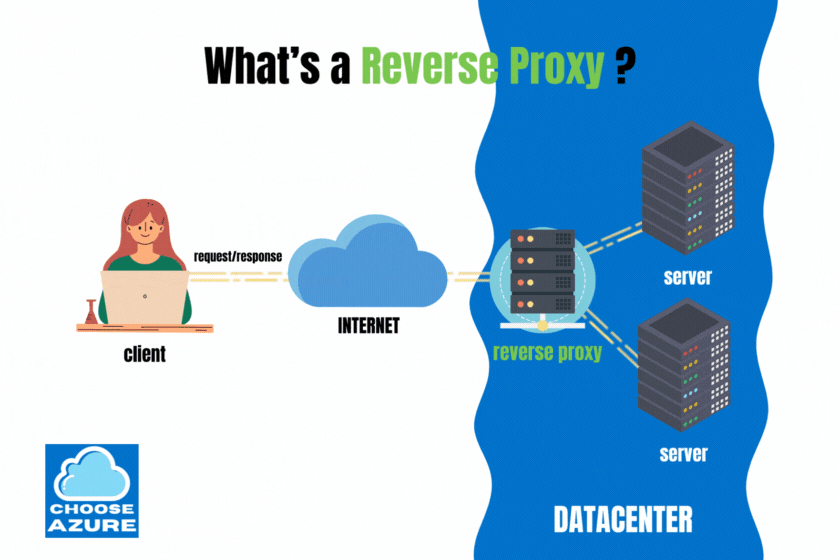
You could think of a proxy server as a server that sends your wishes to the internet for someone unknown to fulfill, and a reverse proxy as a server that takes those same whishes and keeps them at home for the local Genie to act on.
Hello YARP
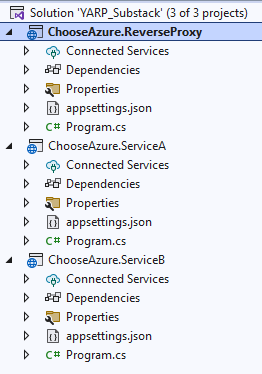
Now, let’s explore how straightforward it is to set up a basic reverse proxy using .NET and YARP. We’ll construct three projects within a single solution: one for the reverse proxy itself and two for the services that YARP will interact with, forwarding requests to them.
While bundling them together suffices for this demonstration, in a real-world production scenario, these components would reside on separate machines and communicate over HTTP.
So, let’s start by creating the proxy and the services.
(The source code is available on GitHub)
Create the Solution and the Services
dotnet new sln
dotnet new web -n ChooseAzure.ReverseProxy
dotnet sln add ./ChooseAzure.ReverseProxy/ChooseAzure.ReverseProxy.csproj

dotnet new web -n ChooseAzure.ServiceA --no-https
dotnet sln add ./ChooseAzure.ServiceA/ChooseAzure.ServiceA.csproj

dotnet new web -n ChooseAzure.ServiceB --no-https
dotnet sln add ./ChooseAzure.ServiceB/ChooseAzure.ServiceB.csproj

cd ChooseAzure.ReverseProxy
dotnet add package Yarp.ReverseProxy
We now have a unified solution housing three distinct service projects: the reverse proxy itself and two additional services intended for YARP’s interaction. Additionally, within our reverse proxy service project, named ReverseProxy, we’ve incorporated the Yarp.ReverseProxy NuGet package. This inclusion equips us with all the necessary tools to establish our reverse proxy effectively.
Next, we need to make a few adjustments to the ServiceA and ServiceB projects.
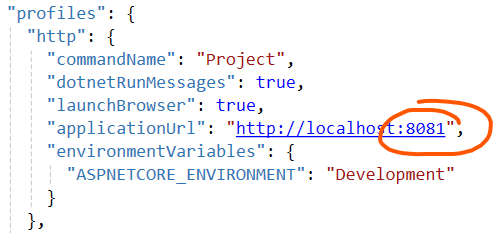
ServiceA:
- Open the launchSettings.json file.
- Change the application’s port to
8081.
- Open the Program.cs file.
- Replace everything in it with the following:
var builder = WebApplication.CreateBuilder(args);
var app = builder.Build();

app.MapGet("/", () => "Hello from Service A!");

app.Run();
ServiceB:
- Open the launchSettings.json file.
- Change the application’s port to
8082.
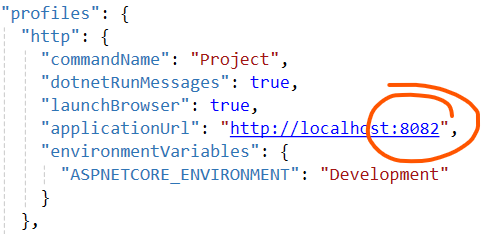
- Open the Program.cs file.
- Replace everything in it with the following:
var builder = WebApplication.CreateBuilder(args);
var app = builder.Build();

app.MapGet("/", () => "Hello from Service B!");

app.Run();
With ServiceA and ServiceB configured, we’ll now focus on the ReverseProxy project.
- Open the appsettings.json file in the ReverseProxy project.
- Replace its current contents with the following code snippet:
{
  "Logging": {
    "LogLevel": {
      "Default": "Information",
      "Microsoft.AspNetCore": "Warning"
    }
  },
  "AllowedHosts": "*",
  "Yarp": {
    "Routes": {
      "CustomerRoute": {
        "ClusterId": "CustomerCluster",
        "Match": {
          "Path": "{**catch-all}"
        }
      }
    },
    "Clusters": {
      "CustomerCluster": {
        "Destinations": {
          "customerServer1": {
            "Address": "http://localhost:8081/"
          },
          "customerServer2": {
            "Address": "http://localhost:8082/"
          }
        },
        "LoadBalancingPolicy": "RoundRobin"
      }
    }
  }
}
Now that we’ve established the basic configuration that YARP requires to start routing and load-balancing requests effectively, let’s highlight the key elements:
- LoadBalancingPolicy: We’ve set this to use the Round-Robin algorithm, which systematically cycles through destinations in order to select one, ensuring a balanced distribution of requests.
- Path: This is critical for route matching. By using
{**catch-all}, our configuration is designed to catch and route all requests, regardless of the specific path. - customerServer1 and customerServer2: These represent our two service endpoints. YARP uses these identifiers to understand where to redirect incoming requests.
Understanding Load-Balancing Options
YARP provides a variety of load-balancing strategies, each suited to different scenarios:
- PowerOfTwoChoices (default): Selects between two randomly chosen destinations, favoring the one with fewer assigned requests. This is the default behavior.
- LeastRequests: Chooses the destination with the least number of active requests, requiring a comprehensive comparison of all options.
- Random: Picks a destination at random.
- RoundRobin: Rotates selection through the destinations in a fixed order, ensuring each one is used evenly over time.
- FirstAlphabetical: Selects the alphabetically first destination available, without considering the current load.
For a deeper dive into what’s available, I encourage you to check the YARP documentation.
Configuring the Reverse Proxy
With our configuration ready, it’s time to set up the Program.cs file in the ReverseProxy project:
- Open Program.cs.
- Insert the following code snippet:
var builder = WebApplication.CreateBuilder(args);
builder.Services.AddReverseProxy()
.LoadFromConfig(builder.Configuration.GetSection("Yarp"));
var app = builder.Build();
app.MapReverseProxy();
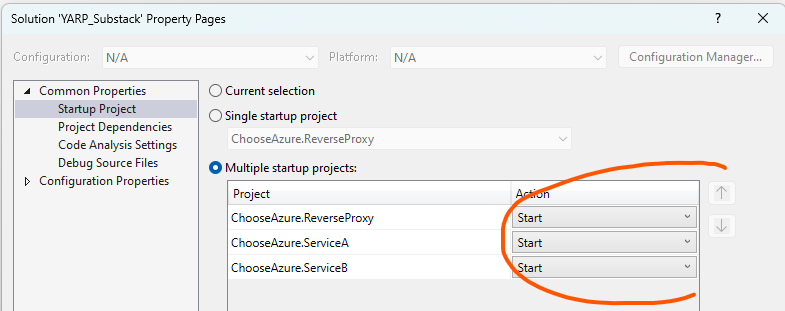
app.Run();This setup reads the configuration we’ve just established and integrates the reverse proxy middleware into our application. And that really is all that we need. However, before we proceed to use it, it’s crucial to ensure that all three projects—the reverse proxy and the two service projects—are started simultaneously.
To achieve this, follow these steps:
- In Visual Studio, configure the solution to start multiple projects at once.
- Select the reverse proxy project and both service projects (ServiceA and ServiceB) to run concurrently.
- Hit ‘Start’ to run them all.
Now, navigate to your proxy project in the browser and hit refresh a few times. You should observe similar results each time, indicating that the reverse proxy is correctly routing and balancing requests between the services.
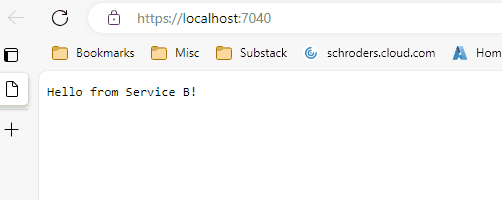
Beautiful! It took us 5 minutes to set up our own reverse proxy.
If you found this useful, please consider sharing it on social media and subscribing. Insights like this one take a lot of time to produce and your support motivates me to keep going. 🙂


